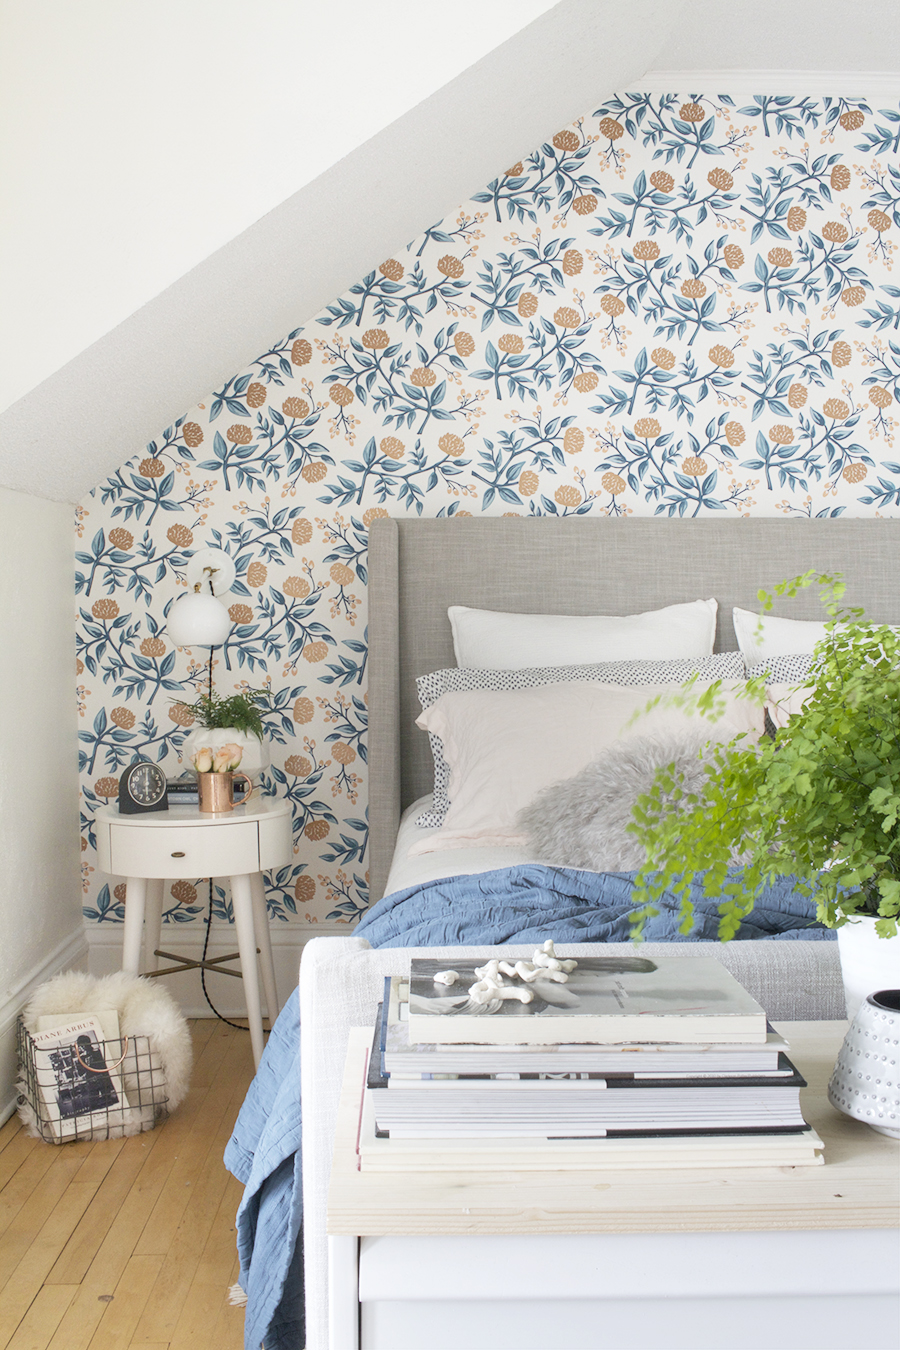
Alright pals – as promised here it is, Part 2 of my photography posts. If you missed it, you can find Part 1 right here where I cover tips for setting up and styling the shot.
Okay, onward! Today I’ll be sharing my photoshop techniques. This is where the photo really comes to life. Before we dive into that, let’s talk about a few quick things.
I thought I should probably share a little about my gear. I use a Canon 7D camera, and I have an assortment of three go-to lenses. The first two are prime lenses (they have a fixed lens and don’t have a zoom), but prime lenses are really affordable. For vignettes I use my Canon EF 50mm f/1.8 Lens
, and for wide shots I’ve been loving my brand new Canon EF-S 24mm f/2.8
pancake lens. The big dawg, good-for-everything lens is my Canon 17-40mm f/4L wide angle
. I’m always curious about what other people are using, so hopefully that helps.
Let’s talk about photoshop. Yes, it’s scary if you haven’t used it, but there are a ton of great tutorials out there AND there are so many different techniques for using it and applying effects. I love to see how photoshop-fluent-friends use photoshop – everyone does it differently and its easy to learn new tricks from watching others use it. You can learn a lot from youtube vids and books too. If you don’t have PS installed on your ‘putron, but you’re interested in purchasing photoshop you can subscribe via Adobe starting at $9.99 per month or try the free 1-month trial.
What I am sharing with you today are the most common go-to photoshop tools that I use for standard interior image editing. There are always, always exceptions to the rule, and in photoshop there many different ways to achieve similar outcomes. For those of you unfamiliar to photoshop I hope that this guide will be an introduction to useful tools. With exploration of the ‘adjustment layers’, ‘layer masking’, and ‘image transformation’ you will begin to learn more and more about photoshop and the endless possibilities it can provide.
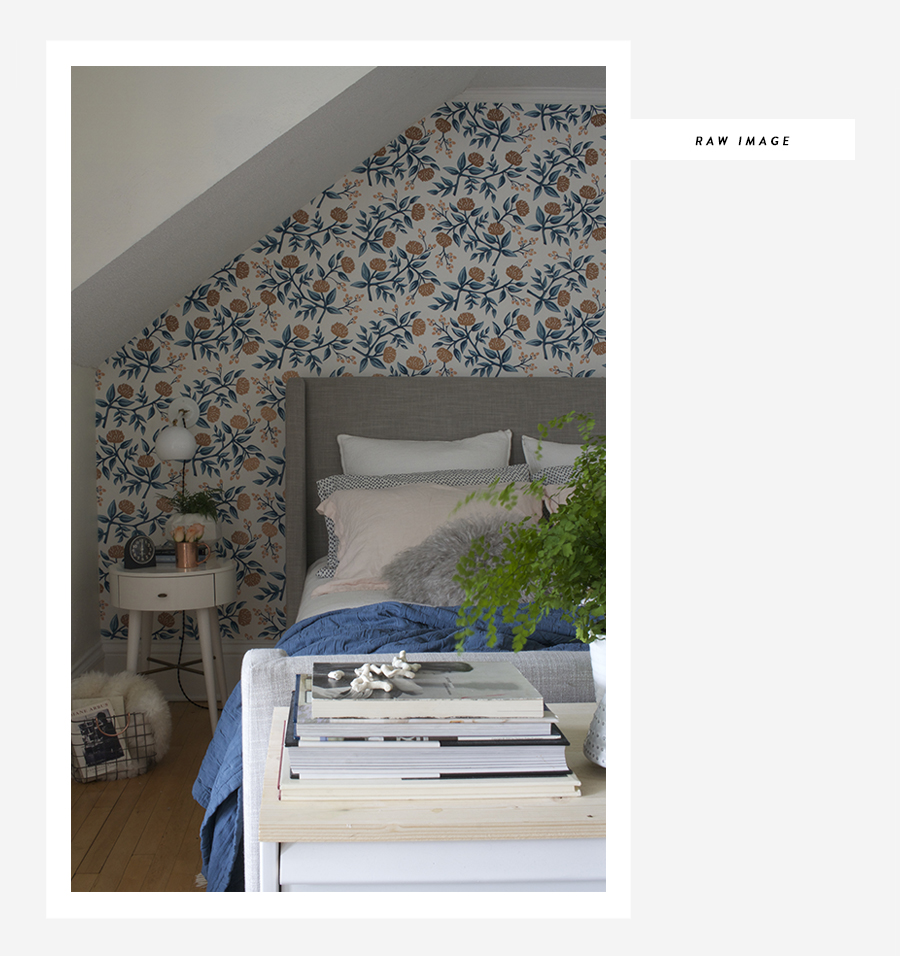
One of the easiest things you can do to produce a better image, is make sure you are shooting RAW. The RAW file format captures all the image data, where as in a jpeg image, information is compressed and the quality is lessened. Shooting RAW allows your camera’s light sensor to capture a higher range of color and brightness, which in turn translates to more attainable quality in post-production editing. The downside is that the RAW format takes up more storage space on your camera or computer, and it can slow your camera down – but really when you’re just shooting interiors, the good outweigh the bad.
Curves
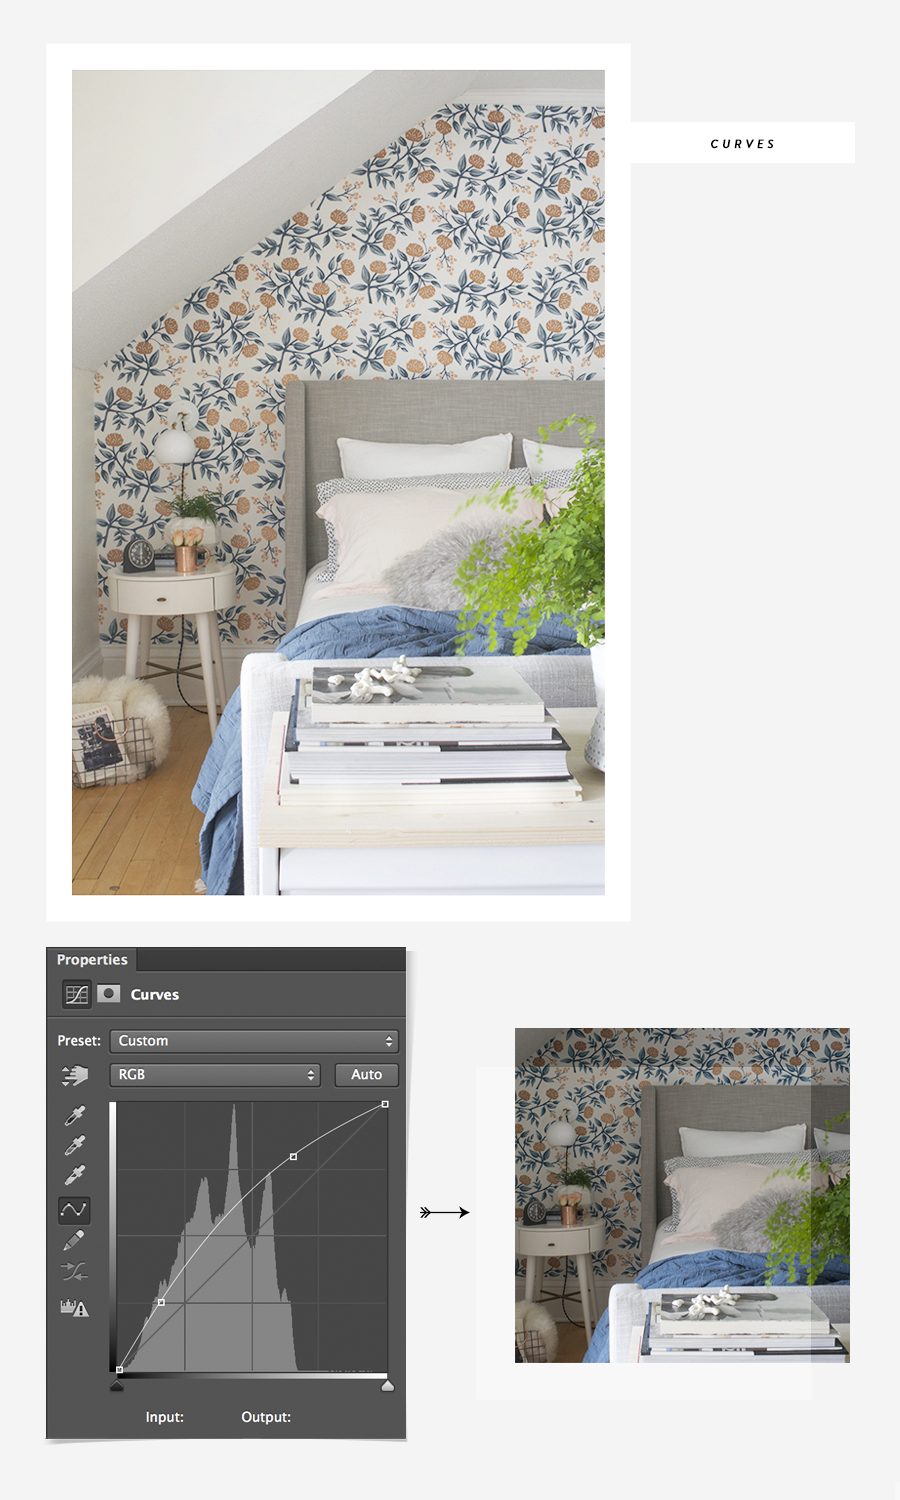
Here we go. Adjustment layers. I love adjustment layers because I can easily build up my images with layers that alter the light, saturation, colors, levels, exposure, and THEN after I put on these rough adjustment layers I can go back and tweak each of them individually – I’ll get to that further on in the post. The following four steps you will find in the ‘adjustment layers’ menu of photoshop. Learn to love them.
First, and probably one of the most crucial layer is ‘curves’. With this layer you can really pull out the brightness, saturation and blacks of an image. I’m a creature of habit and I always start by pulling the control point slightly up on the shadows (the little dot you see on the lower left hand side) then I follow that by pulling on the highlights (upper right side). I slowly tweak this until I find a sweet spot I’m happy with. Because you’ve created a layer for this adjustment you can always come back and adjust these positions as you continue on with your editing.
I’ll be using these two words about a millions times in this post “Tweak” & “Adjust(ment)(s)” I already feel like I’m stuck in a word groove, don’t hate me.
Brightness / Contrast
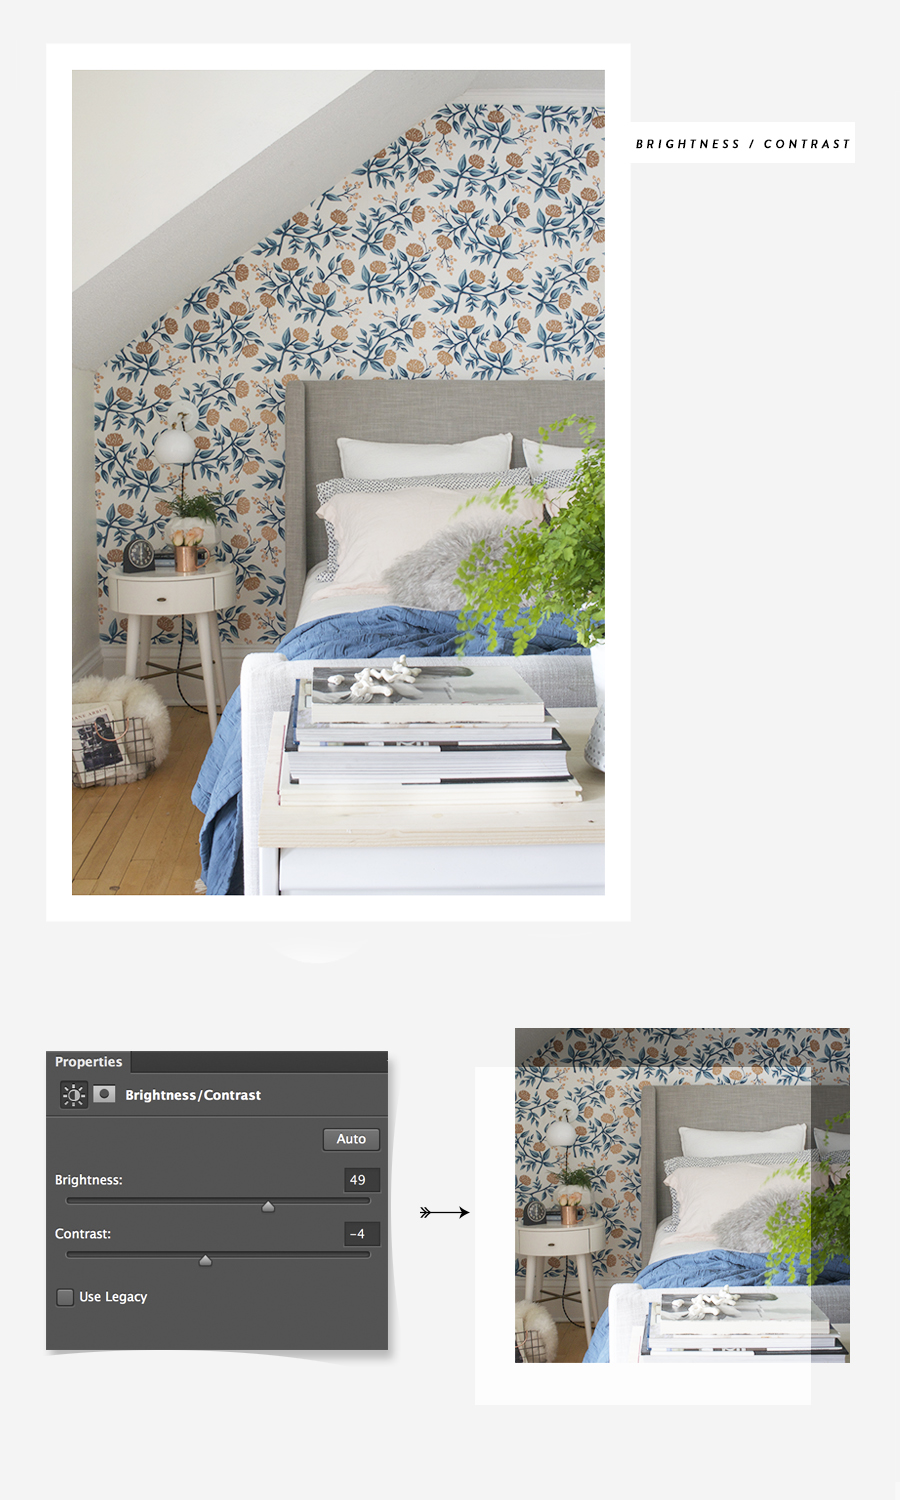
The next equally important layer is ‘brightness and contrast’. I love this layer. I’m always pushing the brightness factor with my images, but I really love the look. When I get to a point where I think the brightness looks good and accurate I always go for it, and just push the brightness up a smidge more. I typically only adjust the contrast on images about 25% of the time. It all depends on the lighting situation at the time the photo was taken.
Hue / Saturation
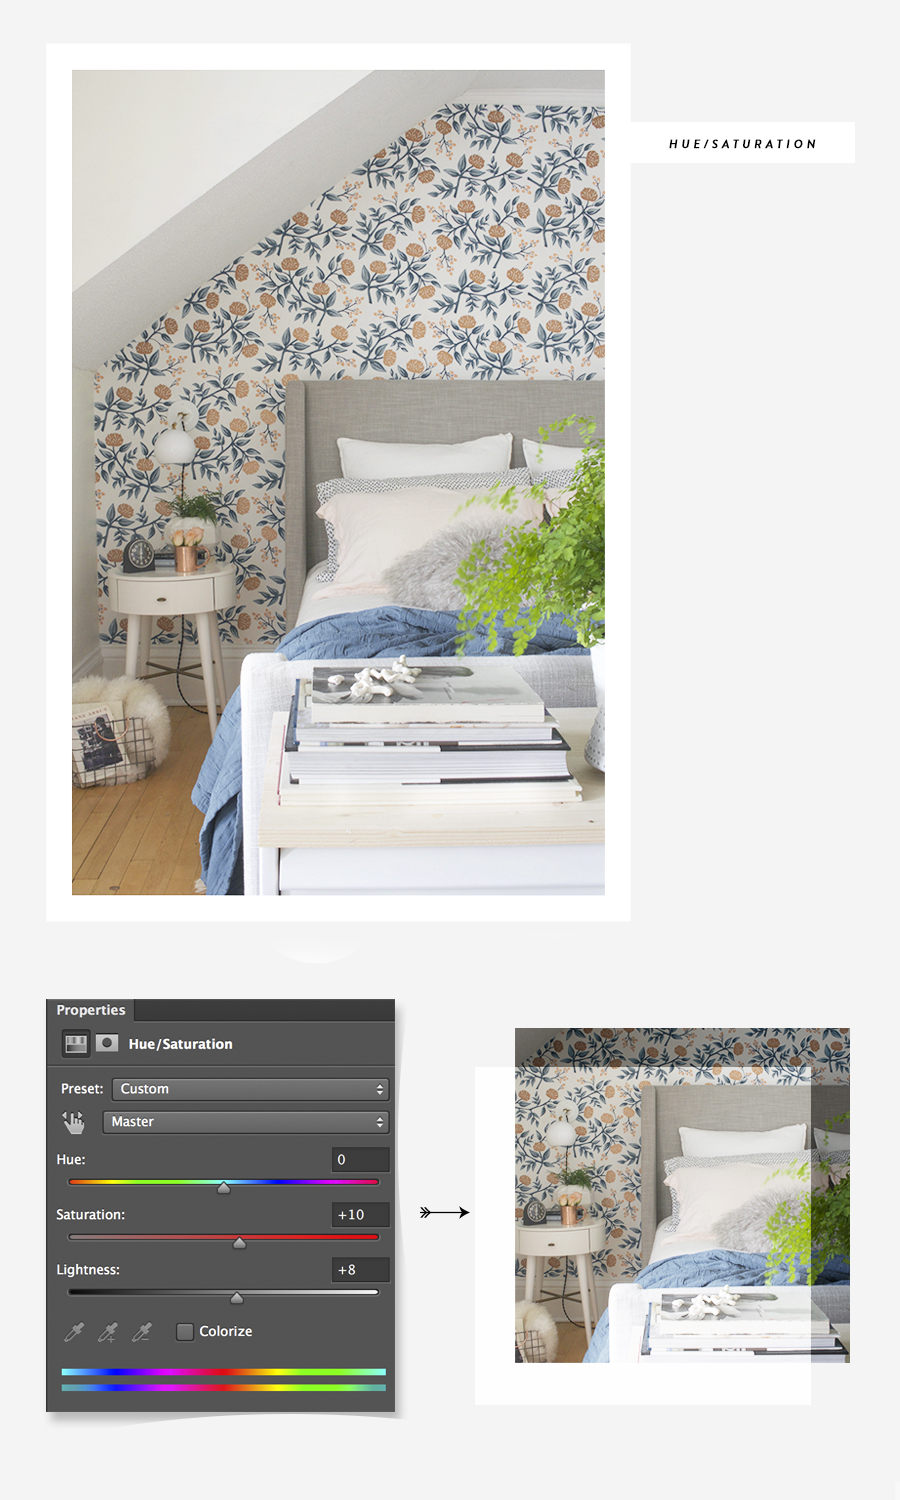
It’s easy to overdue with the ‘hue/saturation’ layer, but sometimes it can be just what an image needs to really stand out. Try it out and see what you think. I would also recommend using the ‘master’ drop down menu in the ‘hue/saturation’ tool to target specific colors. For instance, the blue blanket on the bed never photographs true to color. In real life, the blanket is a dark teal blue, but it always photographs very blue and less teal and for some reason reflects light. It’s a mystery, I don’t get it. I am constantly having to target the blue blanket and tweak the colors making it look more true to life.
Selective Color
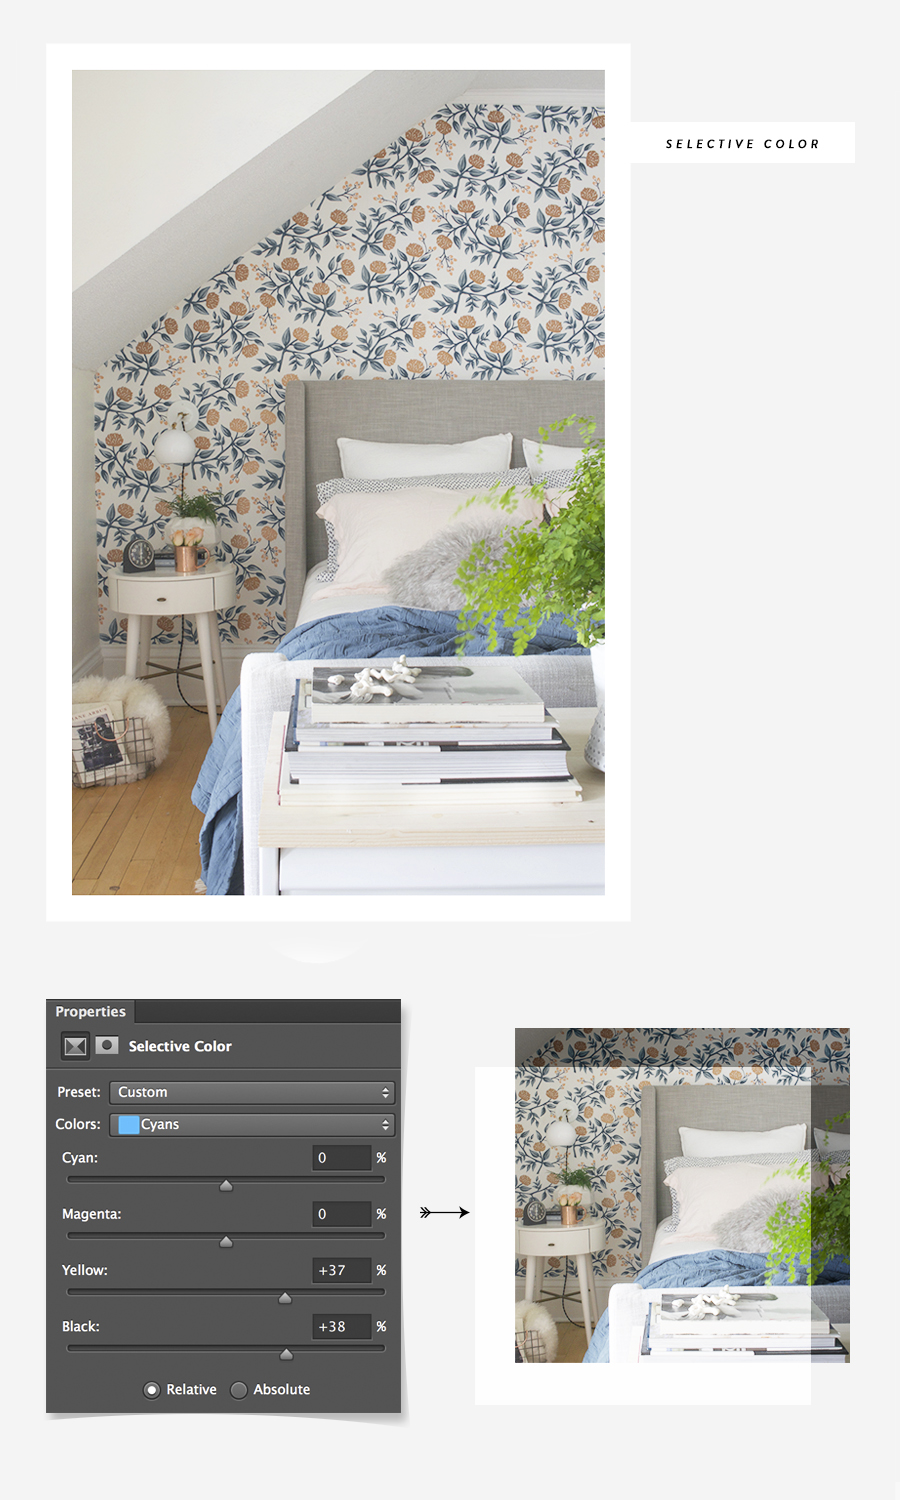
Okay, ‘selective color’ time! This is my secret weapon. This is how I really make a photo beautiful. Remember that blanket I was just talking about – if I wasn’t able to get it to a point that looked correct with the ‘hue/saturation’ layer, I’d target it with the ‘selective color layer’. I almost always alter the blacks, greys, yellows and blues using the ‘selective color’ too. If you have an image with plants in it, this tool is especially helpful in making those indoor plants look really lush and green. Play around with it, you’ll get what I’m talking about.
Skew
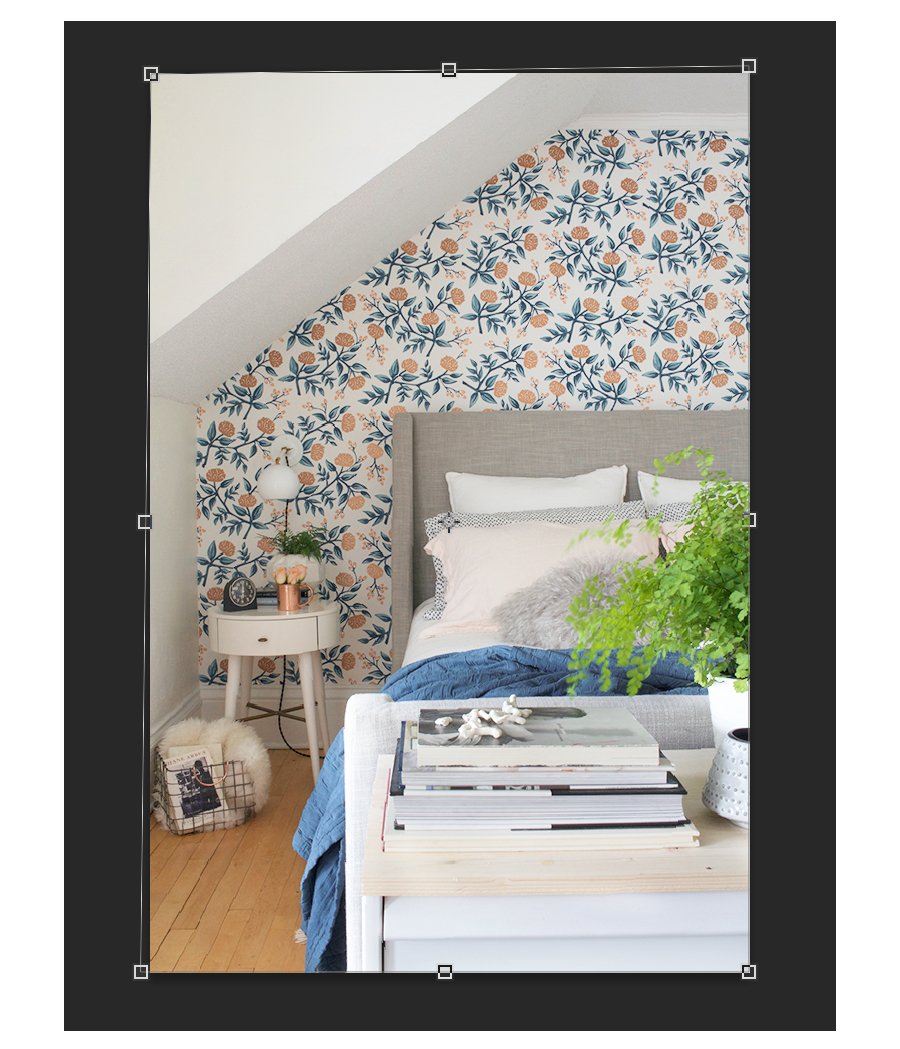
Hey Guys, do you know that it is impossible to take a photo with a wide angle lens without having the image begin to curve inward at the corners? This happens because a lens is conical and the curve or distortion of the lens can be seen the wider (the shorter the focal length) the lens gets. It’s always gonna happen, so don’t fight it. Do your best to line up an image in the frame before snapping the pic and then when you bring the image back to photoshop, use the skew or warp tool. Pull on the control points to straighten out your image. Yay! Better, right?
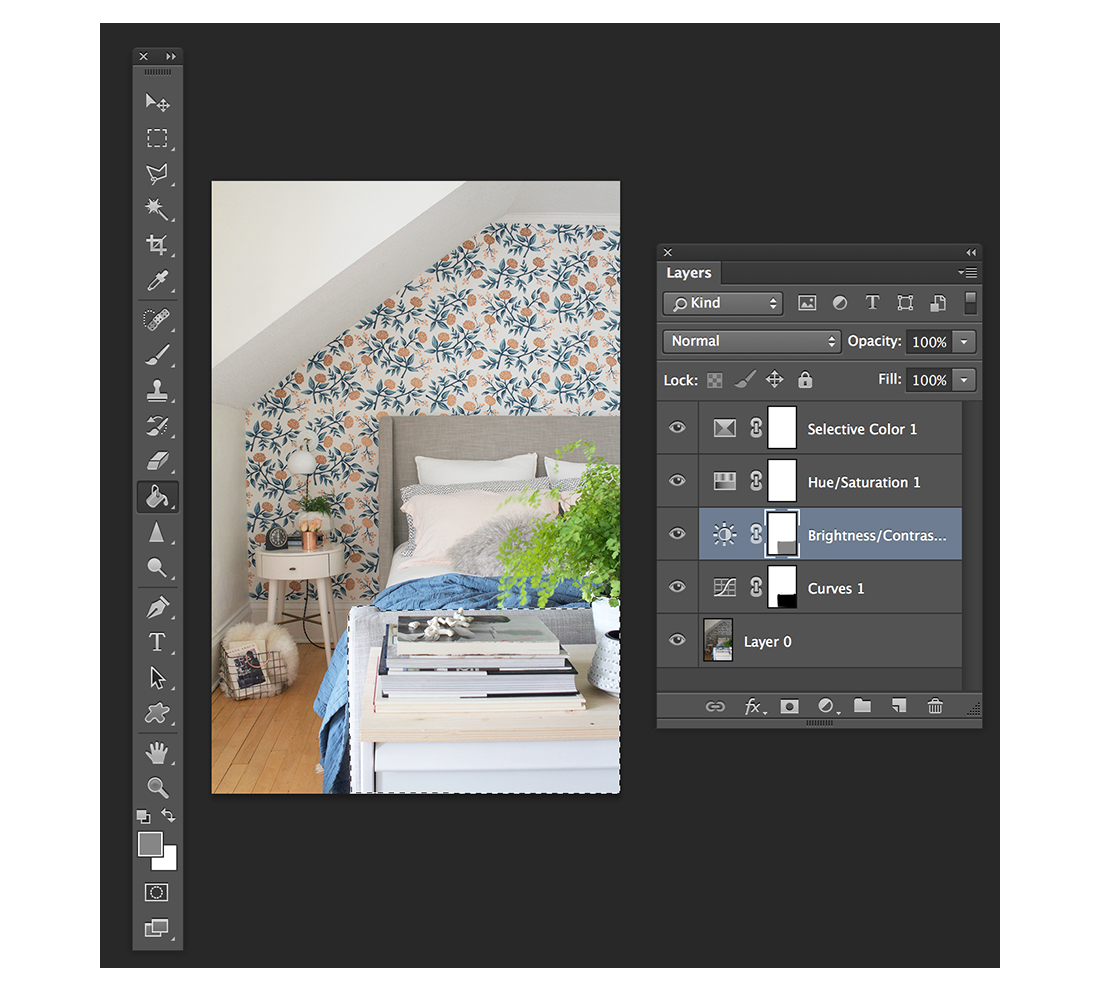
Lastly, there are layer masks. I’m fairly new to layer masks and have been only been using them for the last year or two, but they’ve really helped to improve my images. For me, I use masks the same way I would’ve had to dodge (lighten) or burn (darken) a photograph while printing in the darkroom. In the image of my bedroom for instance: the white dresser at the end of the bed is very blown out since I’ve applied all of these different adjustment layers. I don’t want that, the dresser looked appropriately exposed when I started this whole process. How do I get it back to the way it was, before I added all the layers? Simple. Mask the layer(s). I use the ‘polygonal lasso tool‘ to outline the area I want to mask, I then select the layer I want the mask to occur on. For this example I’ll be masking the curves and brightness layers. Next, I use the ‘paint bucket‘ to add black paint to the selected area, thus masking the adjustment layer in that section. You will see if you look at the layers, that part of the ‘curves mask’ is now painted black. If I mask they layer by ‘painting’ with grey rather than black it will mask the area allowing the mask to have “transparency” (see the brightness/contrast layer mask above for an example). I know, it’s all kind of a crazy concept, and I can’t outline it all in this post. I am however going to recommend checking out this site if you’d like to learn more about masking adjustment layers.
So that’s it, guys. I more or less use this system over and over again. I alter it here and there for every image I edit, but basically this is it. How’d I do? I hope I was able to help someone. If there’s something you’d like to add on feel free to leave a comment. Peace out, pals – it’s spring in Minneapolis, have a great weekend!




Do you do any edits in Camera Raw before taking it into Photoshop? I haven’t been shooting in RAW because I’m scared of the file sizes. I’d love to hear any tips you have for dealing with excess RAW files.
Also, have you used the Lens Correction tool in the Filter menu? It’s awesome! Corrects warping and vignetting and all sorts of things and it will probably automatically recognize your lens and correct for it.
Great post!
I don’t have any tips on Raw files. I am just constantly dumping batches of photos onto an external hard drive after I am done editing what I need.
I will totally give Lens Correction a try. This is why I like sharing this stuff. There’s so much I don’t know!
OMG Photoshop scares the crap outta me. I tanked it in college and have been afraid of it since. I think its interesting how different photographers have different takes on shooting in RAW. I currently don’t because I was advised not to, but now Im second guessing that…
I think it probably comes down to whatever your style of shooting is and what works best for you. I am like the oldest lady when it comes to trying new things with my camera or with photoshop, I just stick with my methods that I know will get me to where I want to be.
Bookmarking both of these photo posts! Thanks so much for sharing your trade secrets, it’s really helpful. I’m trying to sharpen my skills so I don’t have to lean so heavily on my boyfriend,who works in video and photo production. He swears by Lightroom for photo editing — to my chagrin because i am just starting to get comfortable in Photoshop! Have you tried it? He claims it allows for greater control and efficiency, but I don’t have my own version of the software.
The bending corners with wide angle is the bane of my existence! I appreciated your tips for avoiding them altogether. I’ve been relying on perspective grid to straighten them out … Sometimes works, sometimes doesn’t.
Hey Chloe! So glad you found some useful tips in here. I just started playing around in lightroom recently, but I prefer photoshop just because it’s what I know. I have happily used lightroom for tethering my camera when taking ‘after’ shots – it’s worked really well for that – and I think it’s improved my composition and styling habits.
I have a pal that works in video and photo production too and he is always going on and on about lightroom – I get it if you were taking photos in mass.
So when I take real estate photos I”m stuck with the windows over exposed. I can take two photos…. and then use photo shop to cut and paste but I don’t really know how and I’d prefer to just shoot it right in the first place and use LightRoom to finish up the photos. Is there some secret I’m missing. I can sometimes get some of the outside to come through but it has to be at the right angle and the sun has to be on the opposite side of the house. Any pointers?
Sounds like you want an HDR photo. If you can change the dynamic range on your camera (you can’t on most) you’re stuck doing the two pictures thing. If you’re using a tripod, you should give this a try in Photoshop: http://www.dummies.com/how-to/content/how-to-create-hdr-images-in-photoshop.html It has produced decent results for me in the past. If you’re using an iPhone there are some decent HDR apps that will do a better job than the standard HDR setting on your phone. Good luck!
Great post, Scoops! You have an AMAZING knack for photography, so it’s really gracious of you to share what you know with everyone here. I shoot on a Canon 5D MkII–usually with a 24-105 f/4L (my workhorse lens!) I use Lightroom A LOT–it’s a huge time-saver for batch processing images with similar characteristics and lighting conditions. I also love that has an “Enable Profile Corrections” feature which detects your lens type from RAW file info and fixes vertical distortion and lens vignetting in one click–SO handy for any kind of architectural/ interiors photography, where as you know, verticals can be the bane of one’s existence! Like you, I considered myself a “Photoshop-only” kind of gal–until a friend convinced me to give Lightroom a whirl. For me, it was worth the mild learning curve pain. Now, I use a combo–Lightroom for sorting/ batch processing, then Photoshop for fine-tuning my best images.
Keep up the awesome work–love your home & your pics! :-)
Oh man, this is making me think I should probably learn more about lightroom. Tell me, how did you teach yourself? A book, youtube videos, your pal? Let me know – I want to know more!
I just taught myself :-) You already know Photoshop well, so I’m sure you’d pick it up really quickly. The principles are the same–just a different interface, which is what took the most getting used to. Cheers!