For Gus’ birthday this year I decided to try something other than your standard issue birthday cake. Being that Finn’s birthday is only 13 days before Gus’, I didn’t really want to spend my entire month of July making cake and ice cream (although I kind of did).
A little back story for ya: My brother and I grew up with our birthdays only 3 days apart. There were a few rare occasions when my mom would try and combine our birthday’s together into one big celebraish. Although I totally understand why she did this I did not like it.
Fast forward 29 years and here you have me with 2 kids who’s birthdays are back-to-back. Obviously, I never anticipated having kids with such close birthdays, but I knew that I had to do everything within my power to give them separate special experiences, especially because I always gave my mom such a hard time about it, and she always delivered on two separate birthdays. Even if it almost killed her.
That being said, it was time to step up the cake game and give them both a unique cake-spierience, cause they are both unique and individual dudes. This year (just like all the others) Finn has made a request for his all time fav: chocolate cake with chocolate chips and chocolate frosting followed up with a side of homemade vanilla ice cream.
Gus’ cake needed to be different, for his sake, as well as the sake of our returning birthday guests. I was going over all the different cake options in my head, and then dawned on me; I should make a layered ice cream cake! Yes, so smart Scoops! The best part is that I get to save my sanity (just a little bit) because this cake is made in small sections throughout the course of a week, so there was no last-minute-pre-b-day-par-tay stress. Plus it’s frozen, so I could have even made it days in advance, which I didn’t do, but you could.
The cake is simple:
3 layers of brownie
1 layer of homemade pistachio ice cream
1 layer homemade vanilla ice cream
1 layer of frozen ganache.
Guess what? I totally used brownie mix instead of making homemade brownies. This is why out of the box brownies rule: they take 5 minutes to prepare (minus baking time), I don’t even need to get the mixer out, just stir those suckers, bake ’em for half an hour, let them cool, and freeze them until cake assembly begins. I always cut corners with cakes and buy the mixes. The frosting and ice cream is always homemade though, those are the important parts :)
I spent an hour over two afternoons preparing ice cream custards. I made vanilla for one layer and pistachio for the other using recipes from epicurious.com. When it was convenient for me, I went ahead and started the assembly putting everything together in a springform pan. The springform made it super easy to get the cake out of the pan when everything was nice and frozen solid. Can you imagine trying to pry an ice cream cake out of a standard cake pan? Not happening.
The bottom layer of this cake is brownie. I grabbed one of my 3 previously frozen brownie disks from the freezer and threw it in the pan. Then I started turning my pistachio custard into pistachio ice cream using the ice cream attachement for my stand mixer. Fast forward to half an hour later and I am spreading out the quart of soft ice cream across a layer of brownie inside the springform pan.
This cake is supposed to be low stress, remember? I’ve made cakes in the past that have taken me entire days to prepare, that is not a fun thing to be doing, especially if you’re hosting a party later that day. This cake is awesome because it requires time to just chill (so punny over here!) in the freezer. Also, you gotta let your ice cream attachment freeze too, this is laid back cake making. I let the cake-in-progress and ice cream attachment freeze for 24 hours before the cake is ready for the next brownie and ice cream layers. Just remember to allow yourself enough time to get all the steps done and you’ll be golden.
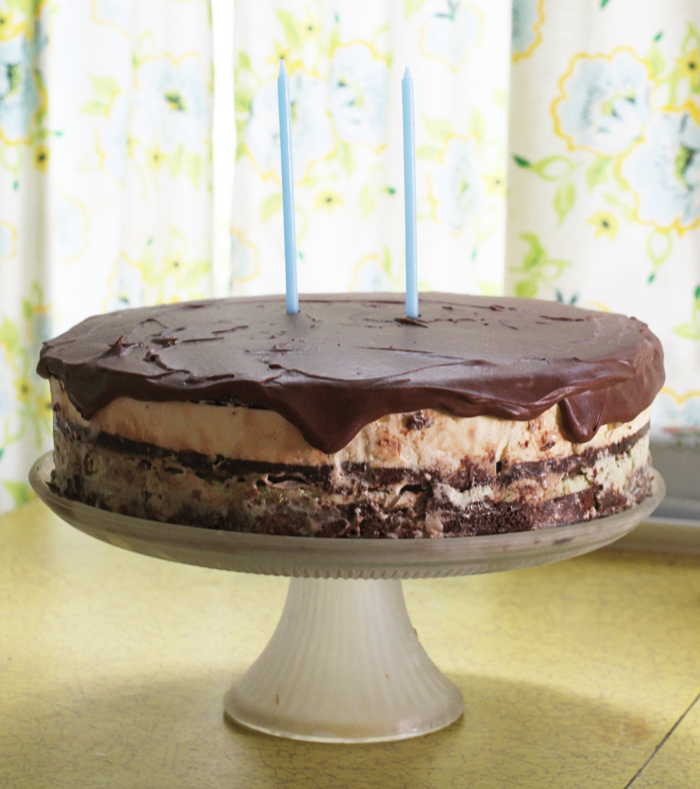
When you’re cake is good and frozen and you’ve prepared your next layer of ice cream you’re ready! Add the next brownie disk and top it off with fresh ice cream exactly the same way you did the first time. For me, these two additional layers (4 layers total) brought my cake right to the top edge of my pan, just like in the above photo. Easy peasy.
Now it’s time to let yer cake freeze up again so that you can add the last layer of brownie (since my cake pan was already full, I just plopped that bad boy on top after the cake was refrozen). For this you don’t have to wait the full 24 hours like you did the last time, I gave mine about 3 and then added the last frozen brownie layer and then stuck the whole enchilada back in the freezer to really firm it up (about 2 more hours).
While the cake was getting super frozen, I went ahead and made a ganache icing for the top using this recipe from foodnetwork.com and then let it cool down to room temperature. While the ganache was cooling I began to remove the cake from the springform pan. Using a serrated knife (that I repeatedly dipped in hot water), I ran it around the edge of the springform. After I was sure that the cake was separated from the edge of the pan, I went ahead and released the springform and slipped it off the cake. Success!
Okay guys, we’re almost there, if you were normal you might add the ganche icing to the cake at this point. I am however am a little insane, extremely anxious, and easily panicked person. To guarantee optimal frozenness I went ahead and returned the cake to the freezer for another half an hour and paced around the kitchen until I was sure the cake was frozen enough that I wouldn’t ruin it.
Now you’re ready for the icing, good job for being patient! This part is easy, spread the ganache over the top with a icing spatula and let if fall over the edge of the cake. I was hoping for more drippy results but what I ended up with wasn’t too bad either. I guess next time I might use a little more heavy cream in the ganache, dur, but this was my first time and I didn’t know any better. I thought it still looked cool, but it took me a minute to accept that it wasn’t going to look exactly how I envisioned it.
Now you’ve made it to the last step, this one is easy, just freeze that cake until you’re ready to partay! My ganache got nice and firm on top of the cake, just like how they do at Dairy Queen, so profesh. Gus totally loved the cake (minus the pistachios), I think he might actually have his own special cake, guys!


Oh my god, I am so very very glad you posted this recipe. When I saw the photo of this cake at the party, I was like, I want that.
As soon as I get my oven back, I am totally baking this!!
Yes, do it! I hope you get your oven back soon ;)
Oh. Em. Gee. One thing that is seriously lacking in this country is GOOD cake. Khmer cake is deceiving. It is decorated beautifully but once you stick a bit in your mouth, you realize you’re tasting actual sponge with high fructose corn syrup poured on top of it. So sad. I want this cake right now. I’m going to eat it for lunch and I don’t care. Okay. Rant. Sorry. But this is amazing.
Yeah, but you have frogs to eat :) I read your post from the other day, I like hearing how brave you are about foods. Hope you are doing well half way around the world, you crazy lady. Can’t wait to see you again!